
Well, I thought it might be nice to kind of do a craft of sorts that burns off excited energy for Halloween and also creates cute accessories for myself. (And you....you'll c :)
(NOTE: I am typing this post with a sprained left thumb that is swollen and puffy. Aren't you proud of me???)
Anyway, let's get to the action, shall we?
Before we begin, here's something you should know about me: I love hats, especially mini ones. And so the idea of creating my own inexpensive hat out of cardboard, decorating it with whatever I'd like, and attaching it to a headband sounded like just about the best thing in the world.
My story begins in my teensy hatter shop called Le Beau Chapeau, where I made a WISH....

...that I would be able to create my very own hat. And suddenly the inspiration struck and I was up and rushing about (which isn't easy to do with a sprained thumb, let me tell ya) and gathering all of my materials.
The first step is to get everything you are going to use to make your hat right in front of you so that you can just put it together and enjoy as soon as possible! So, get your hot glue gun plugged in (you'll need it soon), grab an empty cereal or chip box (come on, we all have one...) and cut it open, like so.

Next, draw lines on your box using a ruler and pencil that specify where you will cutting. At the moment, we are constructing the actual hat part of our mini top hat. I would give you instructions on how big to make yours, but really, that's up to you. I made mine 2 inches wide and 9 inches long. Remember that it needs to fit on a headband, so don't make it too big.

Do you see the faint pencil marks? That's where I drew my lines. Cut out and ready to be glued together, it looks like this.

That's probably your best bet when it comes to size, but you can always go smaller if you wish. :) So, let's move on. I didn't take pictures of every single step because I was pretty carried away with excitement and had to force myself to stop to photograph what I was doing. I wanted to make sure everyone interested out there has the chance to make something so easy, inexpensive, and adorable!
Well, the next step is to glue the hat edges together, so that it forms a circle. I didn't glue it right on the very edge, so feel free to go in a little bit. That's partly why I made mine longer than necessary--so I could play around with size.
Next, use the circular shape of your hat to trace a circle onto the cardboard of you box. Glue that circle on top of the hat to create the top.
And now for the brim....well, just draw a slightly larger circle than the one you cut out for the top of the hat, maybe half an inch longer than the top. Keep in mind that it doesn't have to be perfect--you will be covering up any imperfections with fabric and hot glue, so if you are a tad OCD about perfect circles and such, RELAX. BREATH. EVERYTHING WILL BE OKAY. :)
Your assembled hat should look like this:

Smudge, get out of the picture :)

Okay, now for the fun part :) We get to decorate! I grabbed some scraps of fabric and ribbon and lace to adorn my hat with.

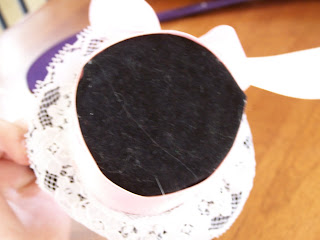
Next, I glued the black fabric onto the hat and the lace around the brim.

You see how the upper part of my hat is all crinkled and uneven, not smoothed down or anything? This is okay! We will be covering that soon enough, so don't freak out!

Here is a front shot of the completed hat. I wrapped a pink ribbon around the hat that was actually the perfect height and tied a bow in the back.

You see what I mean? You can't even see the black imperfections. The purpose of the black was just for back-splash effect.


I then wrapped a headband in black ribbon and hot glued the hat onto the headband and...voila! A completed hat!

NOTE: Keep in mind that if your headband is not strong enough to hold up your hat (mine wasn't) you just have to take some tape or ribbon and attach it vertically across the headband onto the hat to make sure it doesn't fall off. You can also use bobby pins to make sure the headband and hat stay in your hair when you wear it.

Well, thanks for stopping by, everyone, and joining the Mad Hattress on another crazy adventure! It was a lot of fun, and I hope you enjoy making these little beauties as much as I do :)
Best Witches!
Hugs and hexes,
<3 Jessica
No comments:
slippers